How to Make Apple Music Louder on Phone/Computer/Car
Sound is one of the first things we notice when choosing a music service or the device we play it on. So when a high-fidelity app like Apple Music doesn’t sound as loud as it should, the frustration is real, especially when everything else sounds just fine on the same device.
Whether the issue started after an update, a new pair of headphones, or it’s always felt a bit too quiet, this guide shows you how to make Apple Music louder. We’ve covered solutions for every device, whether you’re listening through built-in speakers, Bluetooth headphones, or inside your car. And no, we’re not here to tell you to clean your speaker mesh or drop your phone in a bowl. You’ll find genuine fixes.
How to Make Apple Music Louder on Inbuilt Speaker or Headphones
These methods of boosting Apple Music work across iPhone, Android, Mac, or Windows, whether the sound is low on Bluetooth headphones, built-in speakers, or both.
Some fixes involve adjusting your device’s settings, while others apply directly to the Apple Music app. We’ll cover them and they should help you get the audio level you’re actually want.
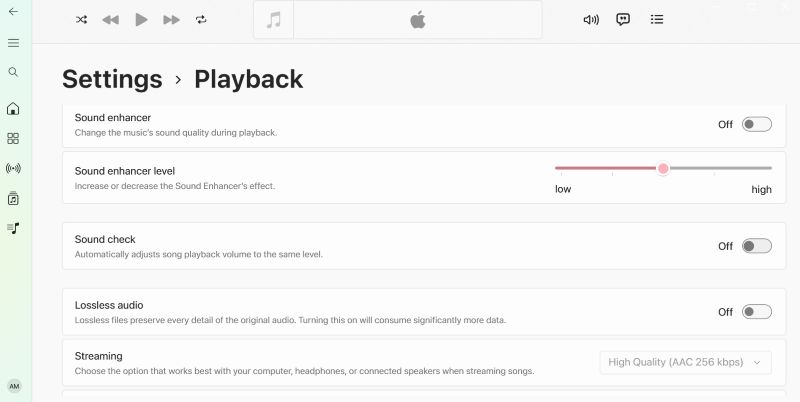
Way 1. Turn up Volume on Apple Music App
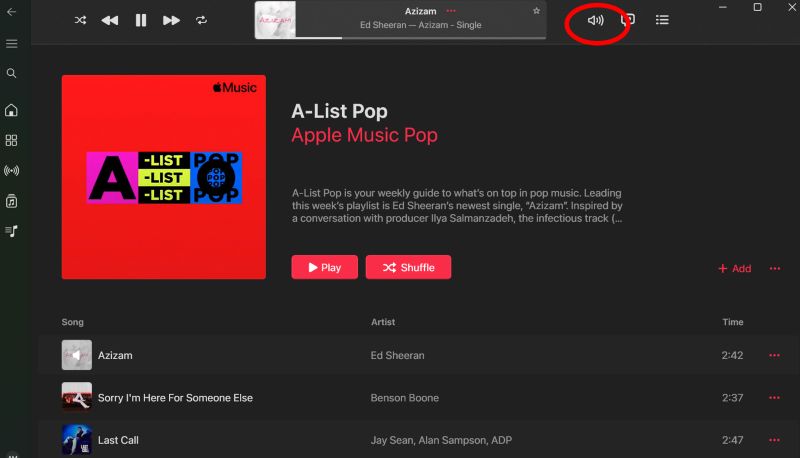
Apple Music has its own volume setting when you’re listening on the desktop. Even if your system volume is maxed out, the app’s internal slider might still be low, say as low as 30%, which can make your music sound quieter than it should. The fix is simple and here are the steps.
On Apple Music for macOS or the web app, when a track is playing:
- Look for the volume slider beside the Now Playing controls. Slide it all the way to the right to raise it fully.

On the Windows app, click the speaker icon at the top right to reveal the volume control. Once it appears, you can adjust it to the level you want.
Way 2. Increase Device Volume
Before moving into deeper settings, it’s also worth checking your device volume.
This is especially important before you adjust crucial features or disable sound limits. So, let’s quickly make sure your volume is set correctly on whichever device you’re using.
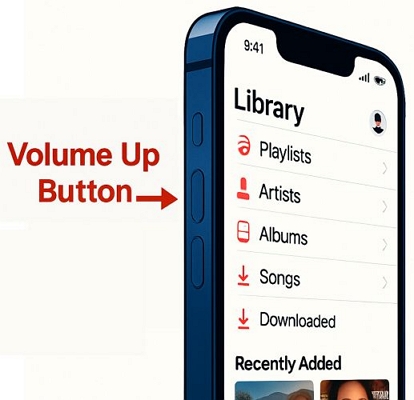
For iPhone
You can simply press the Volume Up button on the side until the sound reaches your preferred level. Or, you can also say something like “Hey Siri, increase the volume by 30%”.
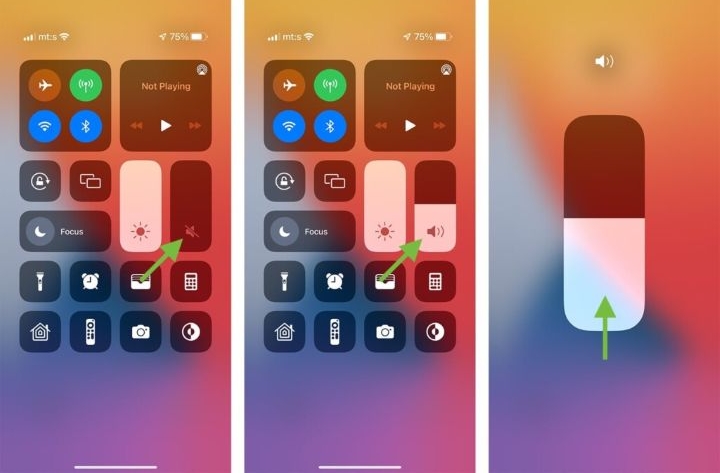
Alternatively, you can open the Control Center and drag the volume bar upward to increase the output manually. This is especially useful when you’re wearing non-Apple Bluetooth headphones.
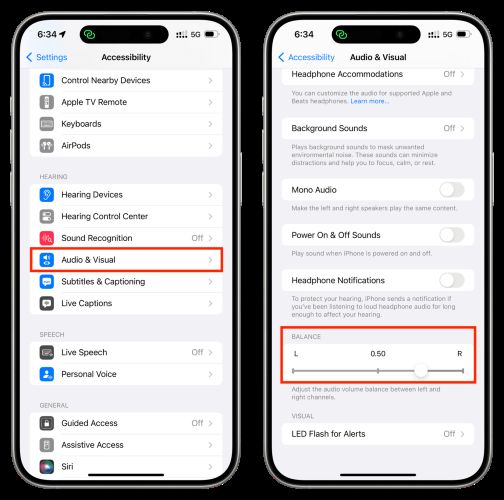
And if you’re using AirPods and notice uneven audio: one side is quieter than the other, go to Settings > Accessibility > Audio/Visual and adjust the Balance slider until the left and right channels are equal.
For Android
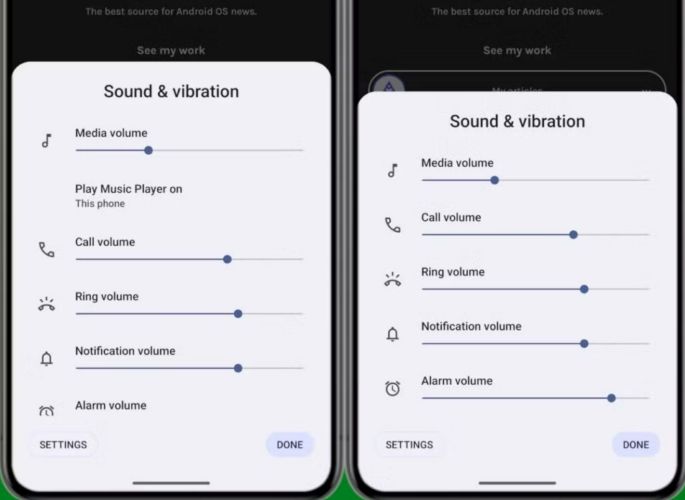
On Android, pressing the side volume button will bring up multiple sliders, for ringtone, media, notifications, and sometimes Bluetooth separately.
Make sure you’re adjusting the media (or Bluetooth volume), not just the ringtone. Slide the volume to the top to get the best output while using Apple Music.
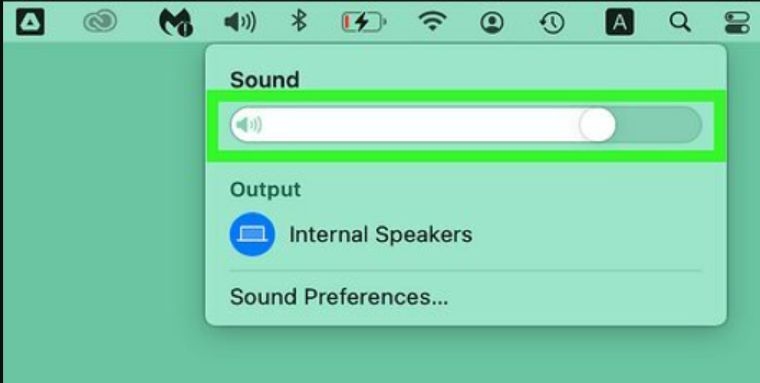
For Mac
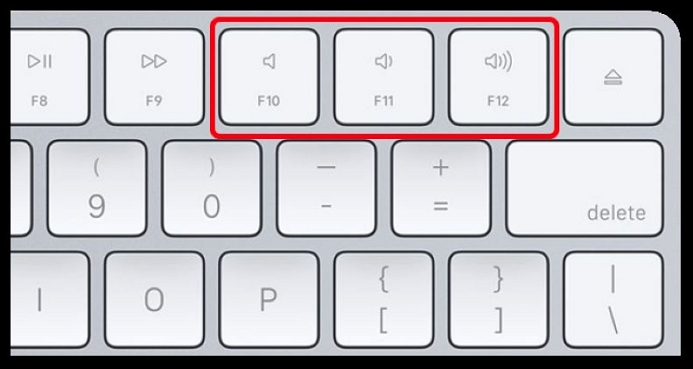
On a Mac, you can increase the volume using the Volume Up key on your keyboard, which is usually mapped to F12, though varies depending on your model.
Another way is to click the speaker icon in the menu bar at the top of the screen. A slider will appear: drag it to the right to raise the system volume.
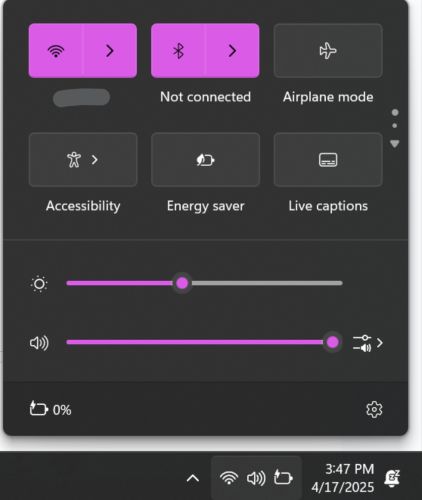
For Windows
Click the volume icon at the bottom-right corner of your taskbar. Then, drag the volume slider to the right to raise the system volume, which applies whether you’re using speakers, wired headphones, or even Bluetooth connections.
Way 3. Disable Sound Check
The Apple Music app has a built-in Sound Check feature that evens out the volume between tracks, so everything plays at a consistent average level. It’s meant to prevent sudden peaks or drops, but in the process, it can dull audio dynamics. You can turn this off to listen to songs the way they were originally recorded.
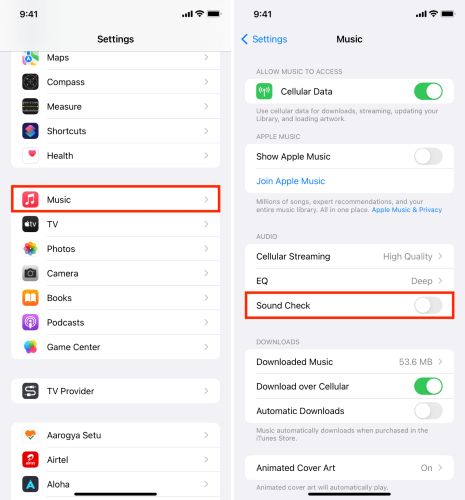
For iPhone
Go to Settings > Music and turn off the Sound Check toggle under the Audio section. This will stop Apple Music from auto-leveling your tracks.
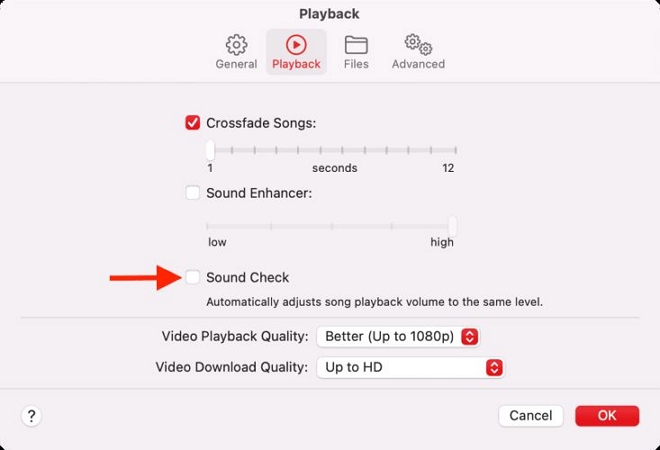
On Apple Music’s Mac or Windows app
On Mac: open the Music app, hit Command + or go to Music > Settings, then jump to the Playback tab. Uncheck Sound Check and click OK to save the changes.
For Windows Apple Music users, choose Settings from the menu (…) drop-down, go to Playback and switch off Sound Check.
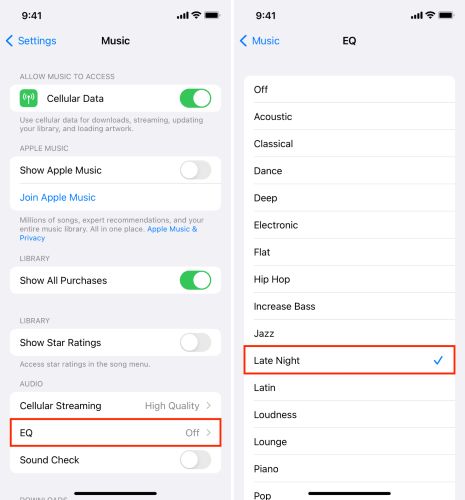
Way 4. Set EQ as Late Night
This one applies specifically to iPhone and iPad users: adjusting your equalizer preset to Late Night. It compresses the dynamic range of your audio. In plain terms, it means the quiet parts get louder and the loud parts get somewhat toned down.
Some Reddit users (including a few audio folks) say it reduces audio detail slightly, but to make songs feel noticeably louder, it’s a quick win.
How to do it on iPhone/iPad:
- Go to Settings > Music and tap EQ.
- Then choose Late Night from the list.
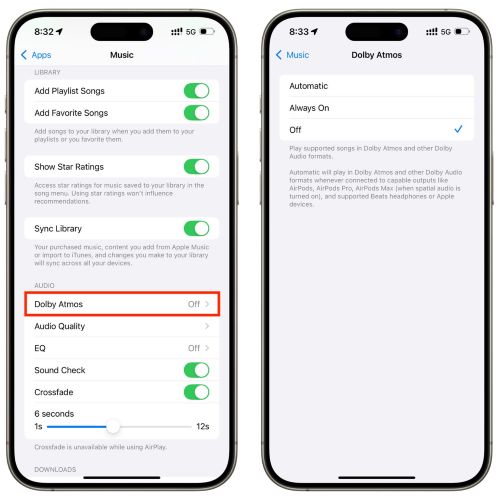
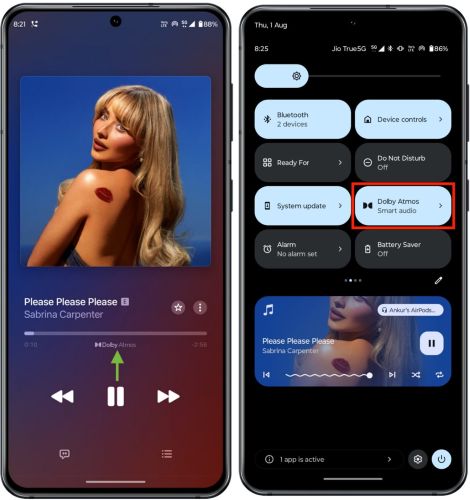
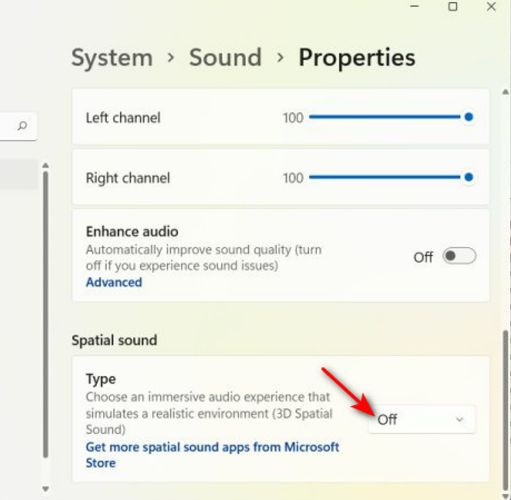
Way 5. Turn off Dolby Atmos
Spatial audio can lower your overall volume by up to 25%, compared to standard stereo playback. That’s because Dolby Atmos spreads the sound and makes it feel less focused or punchy.
So, if your device doesn’t fully support spatial audio (like AirPods Pro or Atmos-compatible gear), it’s worth turning Dolby Atmos off.
Here’s how to disable it across different platforms.
For iPhone
- Head into your Settings app, scroll to Music, and tap it.
- Under the Audio section, you’ll see Dolby Atmos, open it and set it to Off.
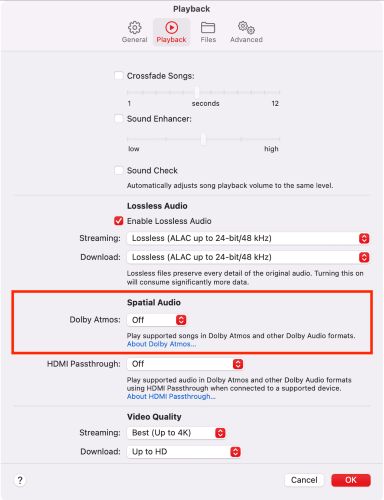
For Mac
- Open the Apple Music app. In the top menu bar, click Music > Settings and switch to the Playback tab.
- Under Spatial Audio, you’ll find a drop-down next to Dolby Atmos. Just select Off from the list and close the window.
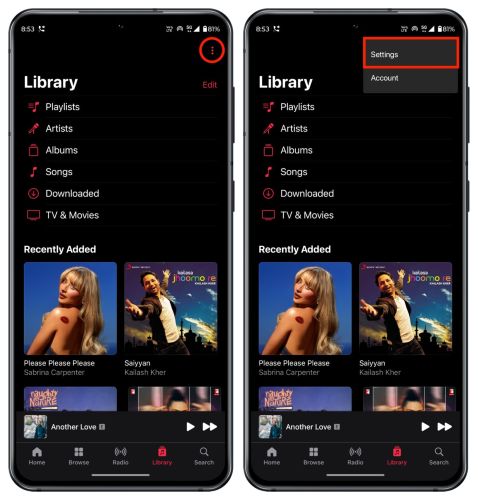
For Android
- Inside the Apple Music app, tap the three-dot menu at the top right and go to Settings.
- Scroll down and toggle Dolby Atmos off.
Some Android phones (like Samsung or Pixel models) also apply Dolby Atmos through system-level audio settings. So, if you still see Dolby Atmos badge showing while a track plays, disable Dolby Atmos from device’s Settings too, which overrides the app-level setting.
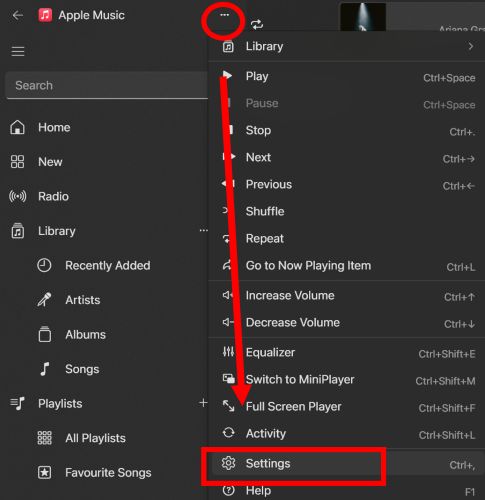
For Windows
The Dolby Atmos controls are like macOS, but the interface changes on Windows. Here’s a look:
- Click the three dots at the top-left of the Apple Music app and choose Settings.
- In the sidebar, go to Playback, scroll to Dolby Atmos, and switch it to Off using the drop-down. This ensures Apple Music stops using spatial mixing.
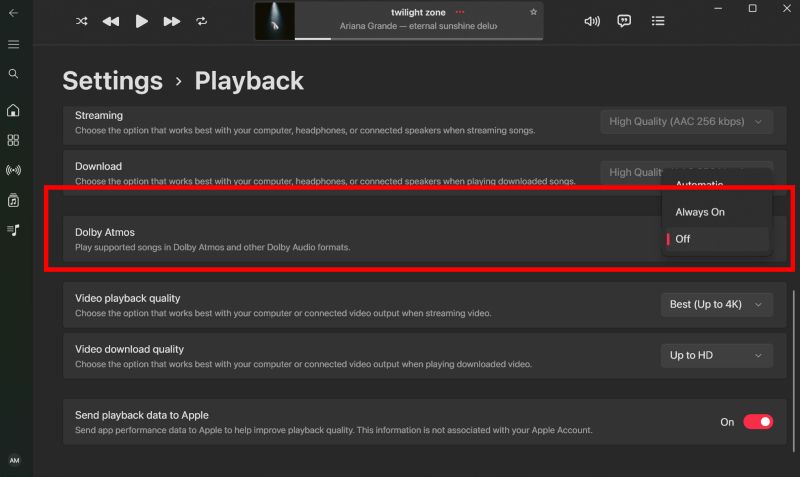
Also, if your system includes Dolby Atmos at the OS level (like on some Windows laptops), head to your Windows Sound Settings and turn off any Dolby Atmos enhancements too. Therefore, it doesn’t override the app’s configurations.
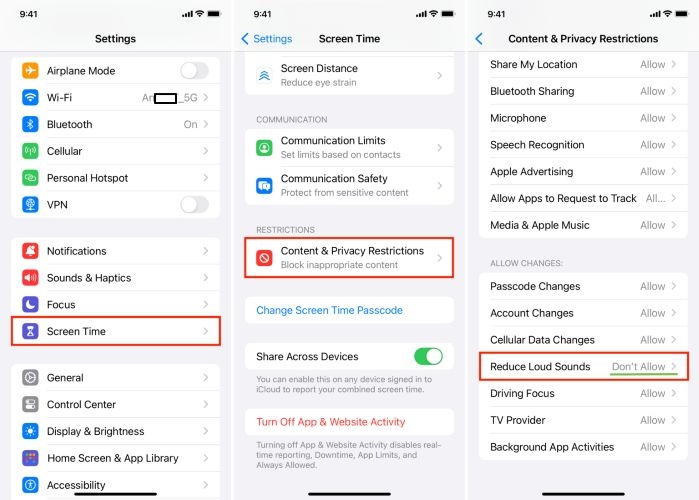
Way 6. Disable Reduce Loud Audio
iPhone come with a setting that limits loud headphone audio. It’s designed to protect your ears by capping the volume at a certain decibel level. Useful? Yes. However, if your music feels too quiet only with headphones, the feature might be the cause. To turn it off:
Go to Settings > Sound & Haptics, select Headphone Safety option under Headphone Audio section, and switch off Reduce Loud Sounds.
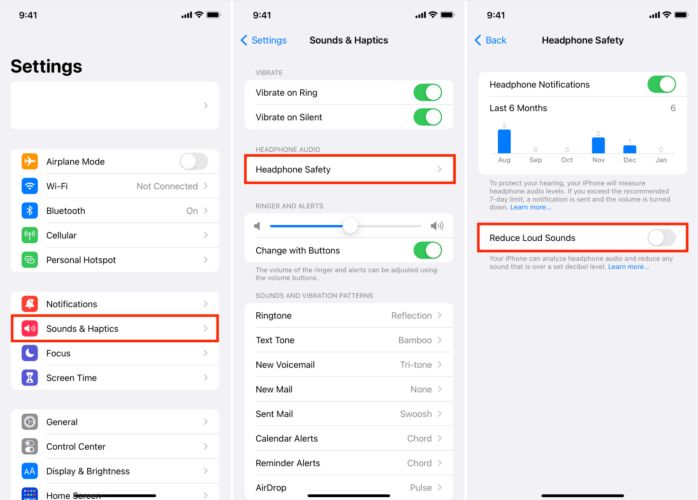
If the “Reduce Loud Songs” option is greyed out, your Screen Time > Content & Privacy Restrictions might be blocking the change. Head there, set it to Allow, and you’ll be able to adjust the toggle again.
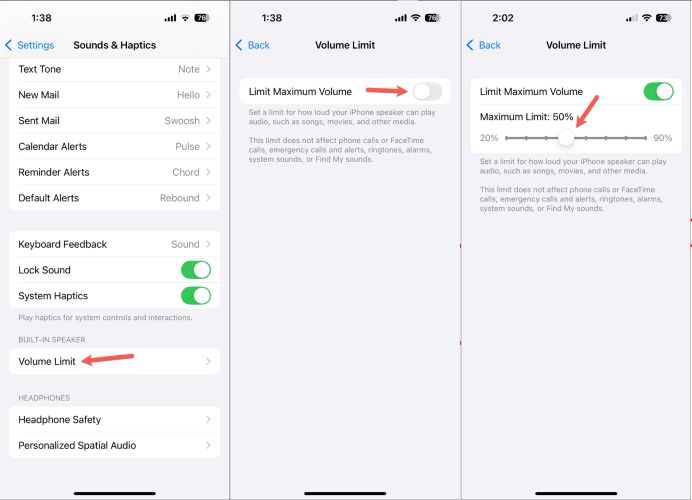
Way 7. Turn off Volume Limit
Starting with iOS 18.2, Apple added a volume limit for both headphones and the iPhone’s built-in speaker. This option is designed to cap audio output at a certain decibel level for hearing protection. So, if your Apple Music suddenly sounds quieter after an update, this setting could be the reason. To change it:
Go to Settings > Sound & Haptics, scroll down to the Built-In Speaker section, tap Volume Limit. Then, turn it off completely or move the slider higher to set your preferred loudness.
Way 8. Use DAC Amplifier
If you use external speakers or high-end headphones with Apple Music, a DAC amplifier is a must-have.
A DAC, short for Digital-to-Analog Converter, transforms the 1s and 0s from your device into smooth analog sound, exactly what your headphones or speakers need to deliver real yet rich audio. It also amplifies the signal itself, giving you louder and cleaner playback.
That said, here are three DAC upgrades worth considering. These are models many of us use in-house:
| Name | Key Features | Price | Why It’s Great for Apple Music | Compatibility |
|---|---|---|---|---|
FiiO JadeAudio KA11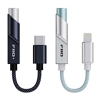
|
Compact USB-C DAC with 32-bit/384kHz support and CS43131 chip | US$ 30 | A clean, clear audio boost over standard headphone ports on Apple Music. | Android, macOS, Windows (USB-C only). Note: iOS is not supported! |
AudioQuest DragonFly Black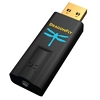 |
USB-A DAC with 32-bit ESS chip and 24-bit/96kHz resolution | US$ 100 | Offer stronger dynamics and volume for lossless and Hi-Res tracks. | Windows, macOS, Android, iOS (with adapter) |
iFi GO blu 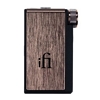 |
Wireless & USB DAC with LDAC, aptX HD, AAC, plus XBass/XSpace EQ | US$ 199 | Ideal for wireless Apple Music streaming with full codec and EQ flexibility | iOS, Android, macOS, Windows (Bluetooth/USB) |
Specific Ways to Make Apple Music Louder in Car
Before trying anything new to make Apple Music sound louder through your car speakers, make sure you’ve gone through the earlier steps including turning off Sound Check, adjusting the Volume Limit, and disabling Dolby Atmos. These settings still apply, even when you’re connected through Bluetooth, Apple CarPlay, or Android Auto.
If you’ve done all of that and your Apple Music still sounds low inside the car, here are a few extra things you can try next.
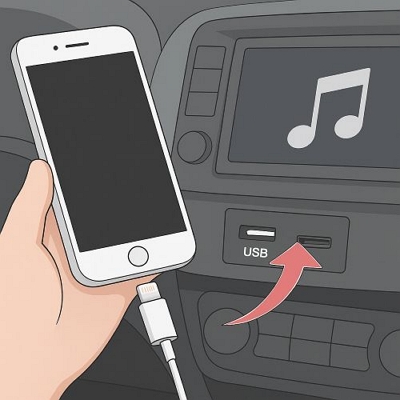
Way 1. Use USB Connection Instead
Bluetooth is convenient, but it compresses audio and limits bandwidth, which affects both sound quality and loudness. So, switching to a wired connection is the quickest way to fix it, giving you better fidelity and more consistent volume.
Even if your car uses a 3.5mm AUX input, this way works too. Just make sure you’re using a quality cable, as cheap or worn-out cables can lead to signal loss or poor sound handling.
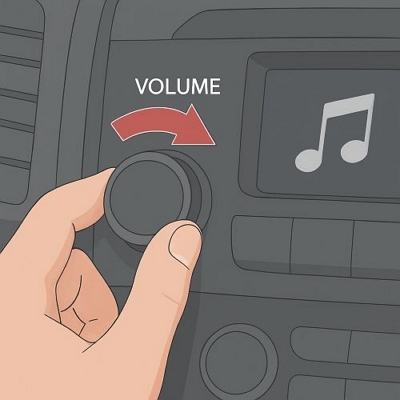
Way 2. Turn up Car Volume
It goes without saying but make sure the head unit or infotainment system volume is turned up to a proper level. It sounds simple, but if it’s set low, no phone setting will fix that.
You can also explore EQ presets built into your car’s system. These are applied independently from the ones on your iPhone or inside the Apple Music app, so switching to a setting like Bass Boost, Loudness, or Custom can make a noticeable difference.
Way 3. Play Apple Music with Inbuilt Media Player
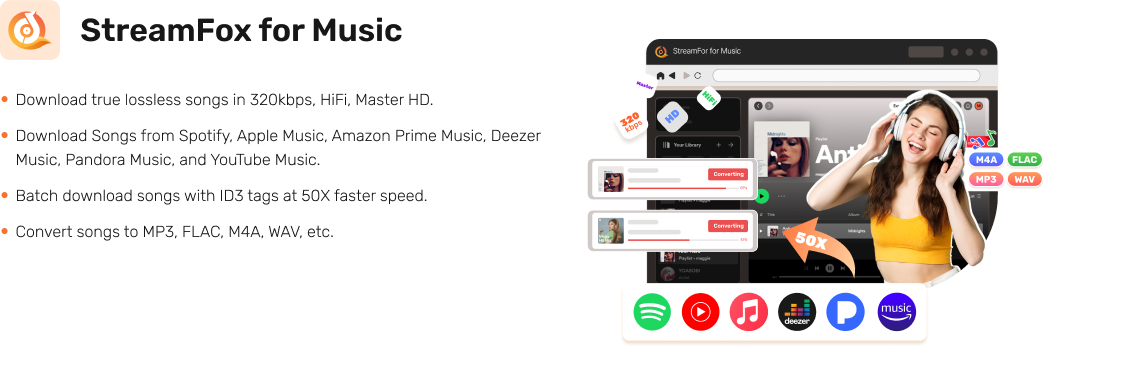
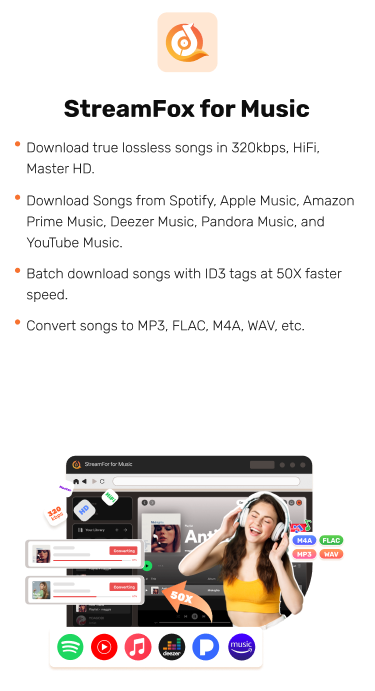
If the above ways can’t make your car play Apple Music louder or you don’t want to flip some many toggles only to enhance its volume, you can consider the better solution: take your music out of Apple Music altogether and play it through the car’s inbuilt media player. Of course, converting Apple Music tracks to open formats isn’t something that Apple allows, but StreamFox for Music is built exactly for that.
StreamFox allows you to convert songs from your Apple Music library and save them to a USB drive on your computer in MP3, AAC, FLAC, etc. Once saved, you can play them in your car via the USB for louder playback. And once your Apple Music library is converted, you can even cancel your Apple Music subscription if you want. Most importantly, you’ll be free to apply EQ tweaks, volume boosts, and playback effects without needing any specific gear.
- StreamFox uses ODSMRT technology to save each converted Apple Music track in high quality.
- Every audio file keeps its original metadata, including cover art, so your music looks complete when playing with external players.
- 10x conversion speed and automatic organizations make the process intuitive and seamless.
- Built-in browser lets you explore your Apple Music library and batch-select tracks with just a few clicks.
Steps to Convert Apple Music with StreamFox for Music
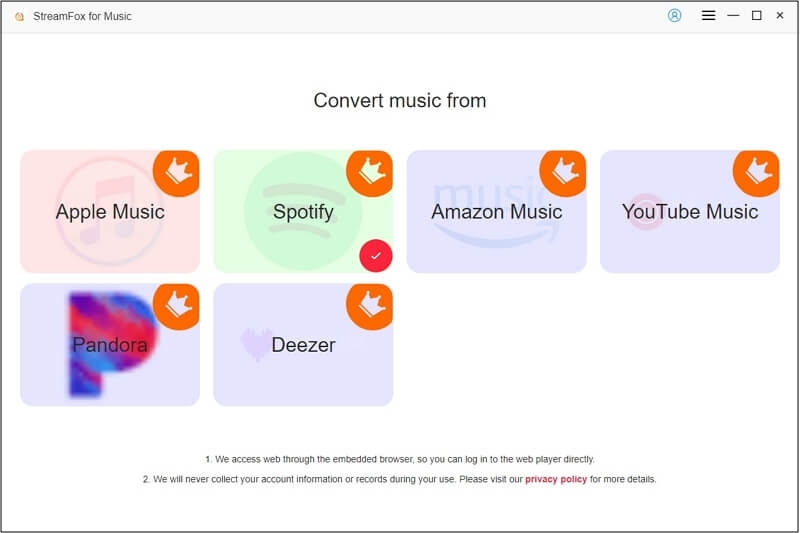
Step 1. Click the installer above (for Mac or Windows) to get StreamFox for Music on your computer. Then, run the software and choose Apple Music from the main interface.
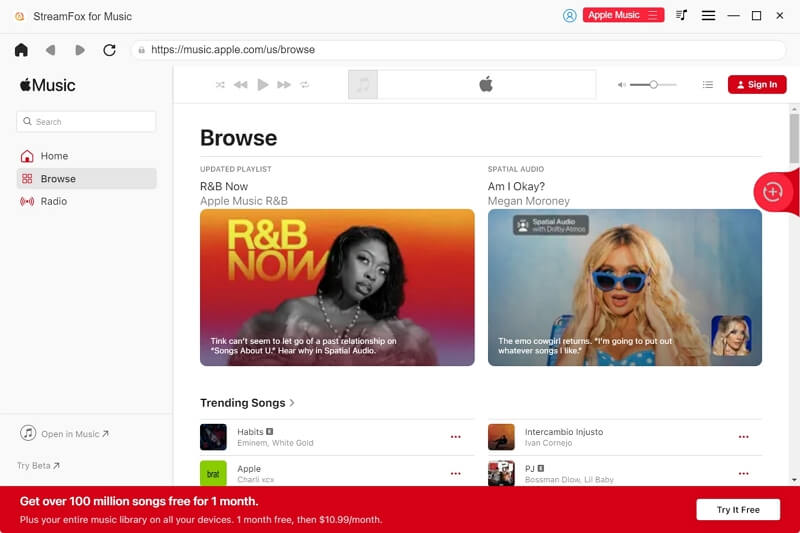
Step 2. Sign in to your Apple ID directly inside the tool to access your library.
Step 3. Drag the songs, albums, or playlists you want into the plus icon at the top right of the screen.
![]()
Step 4. Hit Convert All to save the selected tracks in high quality to your computer.
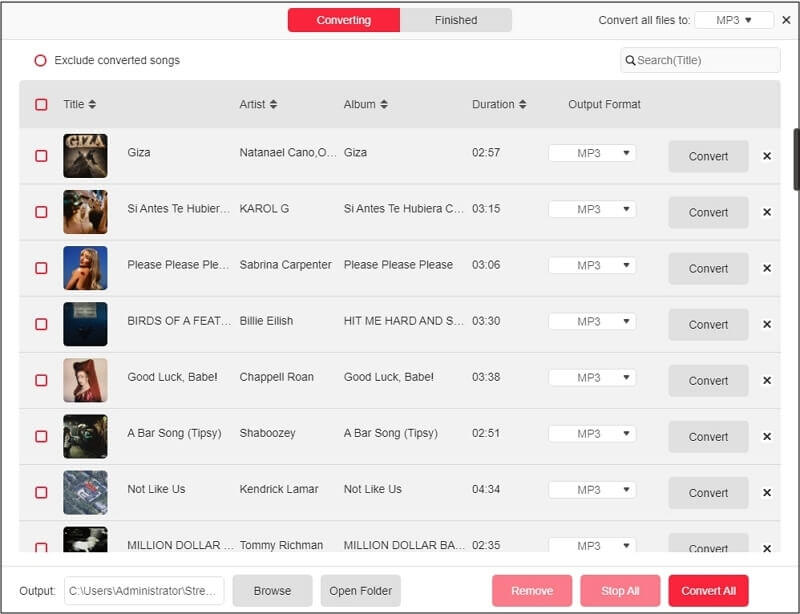
Step 5. Once the conversion is done, you can move the songs to your USB drive.
Step 6. Insert the USB drive to your car, tap Audio or something similar to play the converted Apple Music in your car stereo.

Conclusion
At the end of the day, all the built-in settings and system tweaks can only take you so far when it comes to making Apple Music louder. Apple Music’s own restrictions often get in the way of how music should really sound.
If you want full control over your listening experience, StreamFox for Music is the way to go. It lets you convert your tracks and play them through another media player that puts you in charge — volume, presets, EQ, everything. Whether you’re in the car, using those high-end headphones, or just playing through your phone speaker, StreamFox allows you to hear your music the way you want.